
How to Create Your Own Cobblemon Server
The easiest way to create a Cobblemon server is to use Minecraft hosting, install the Cobblemon mod from the host panel, start the server, then share the IP with friends. For a small 2-3 player server, 6 GB RAM is a sensible starting point.
Affiliate disclosure
This guide includes a WiseHosting affiliate link. Cobblewiki may earn a commission if you buy through it, at no extra cost to you.
Quick answer
For most friend groups, start with a hosted server, install the Cobblemon mod from the host panel, and use 6 GB RAM for 2-3 players. On WiseHosting, open your server, go to Addons, then Mods, search for Cobblemon, install the version you want, start the server from Console, and copy the IP from the top right.
Cobblemon multiplayer is best when the server is boring in the right ways: it starts reliably, backs up your world, keeps the same modpack version for everyone, and gives you enough control to fix configs when something breaks. You do not need to run a public network to make a good server. A small private world for friends is usually the better first project.
Short Version
Cobblemon is currently for Minecraft: Java Edition, with the official wiki listing the latest version on Minecraft 1.21.1. The project is available for Fabric and NeoForge, and the official NeoForge modpack on Modrinth supports both client and server installs. Check the Cobblemon installation guide and the official NeoForge modpack page before choosing versions.
What You Need Before You Start
Decide these details first. They affect every setup step after checkout, including the host plan, the modpack version, and how your friends connect.
- A Minecraft: Java Edition account for every player who will join.
- A target player count, even if it is only an estimate.
- A loader choice: Fabric, NeoForge, or the specific loader used by the modpack you want.
- A client install method for players, usually Modrinth, CurseForge, Prism Launcher, or the same pack your server runs.
- A plan for moderation: whitelist, operators, rules, and backup access.
The Easiest Setup: Use Hosted Cobblemon Server Hosting
If you want to play more than you want to manage Linux, use a Minecraft host. A host gives you a control panel, server console, file manager, backups, version switching, and a public address your friends can join. That matters for Cobblemon because modded servers are more sensitive to version mismatches than vanilla Minecraft.
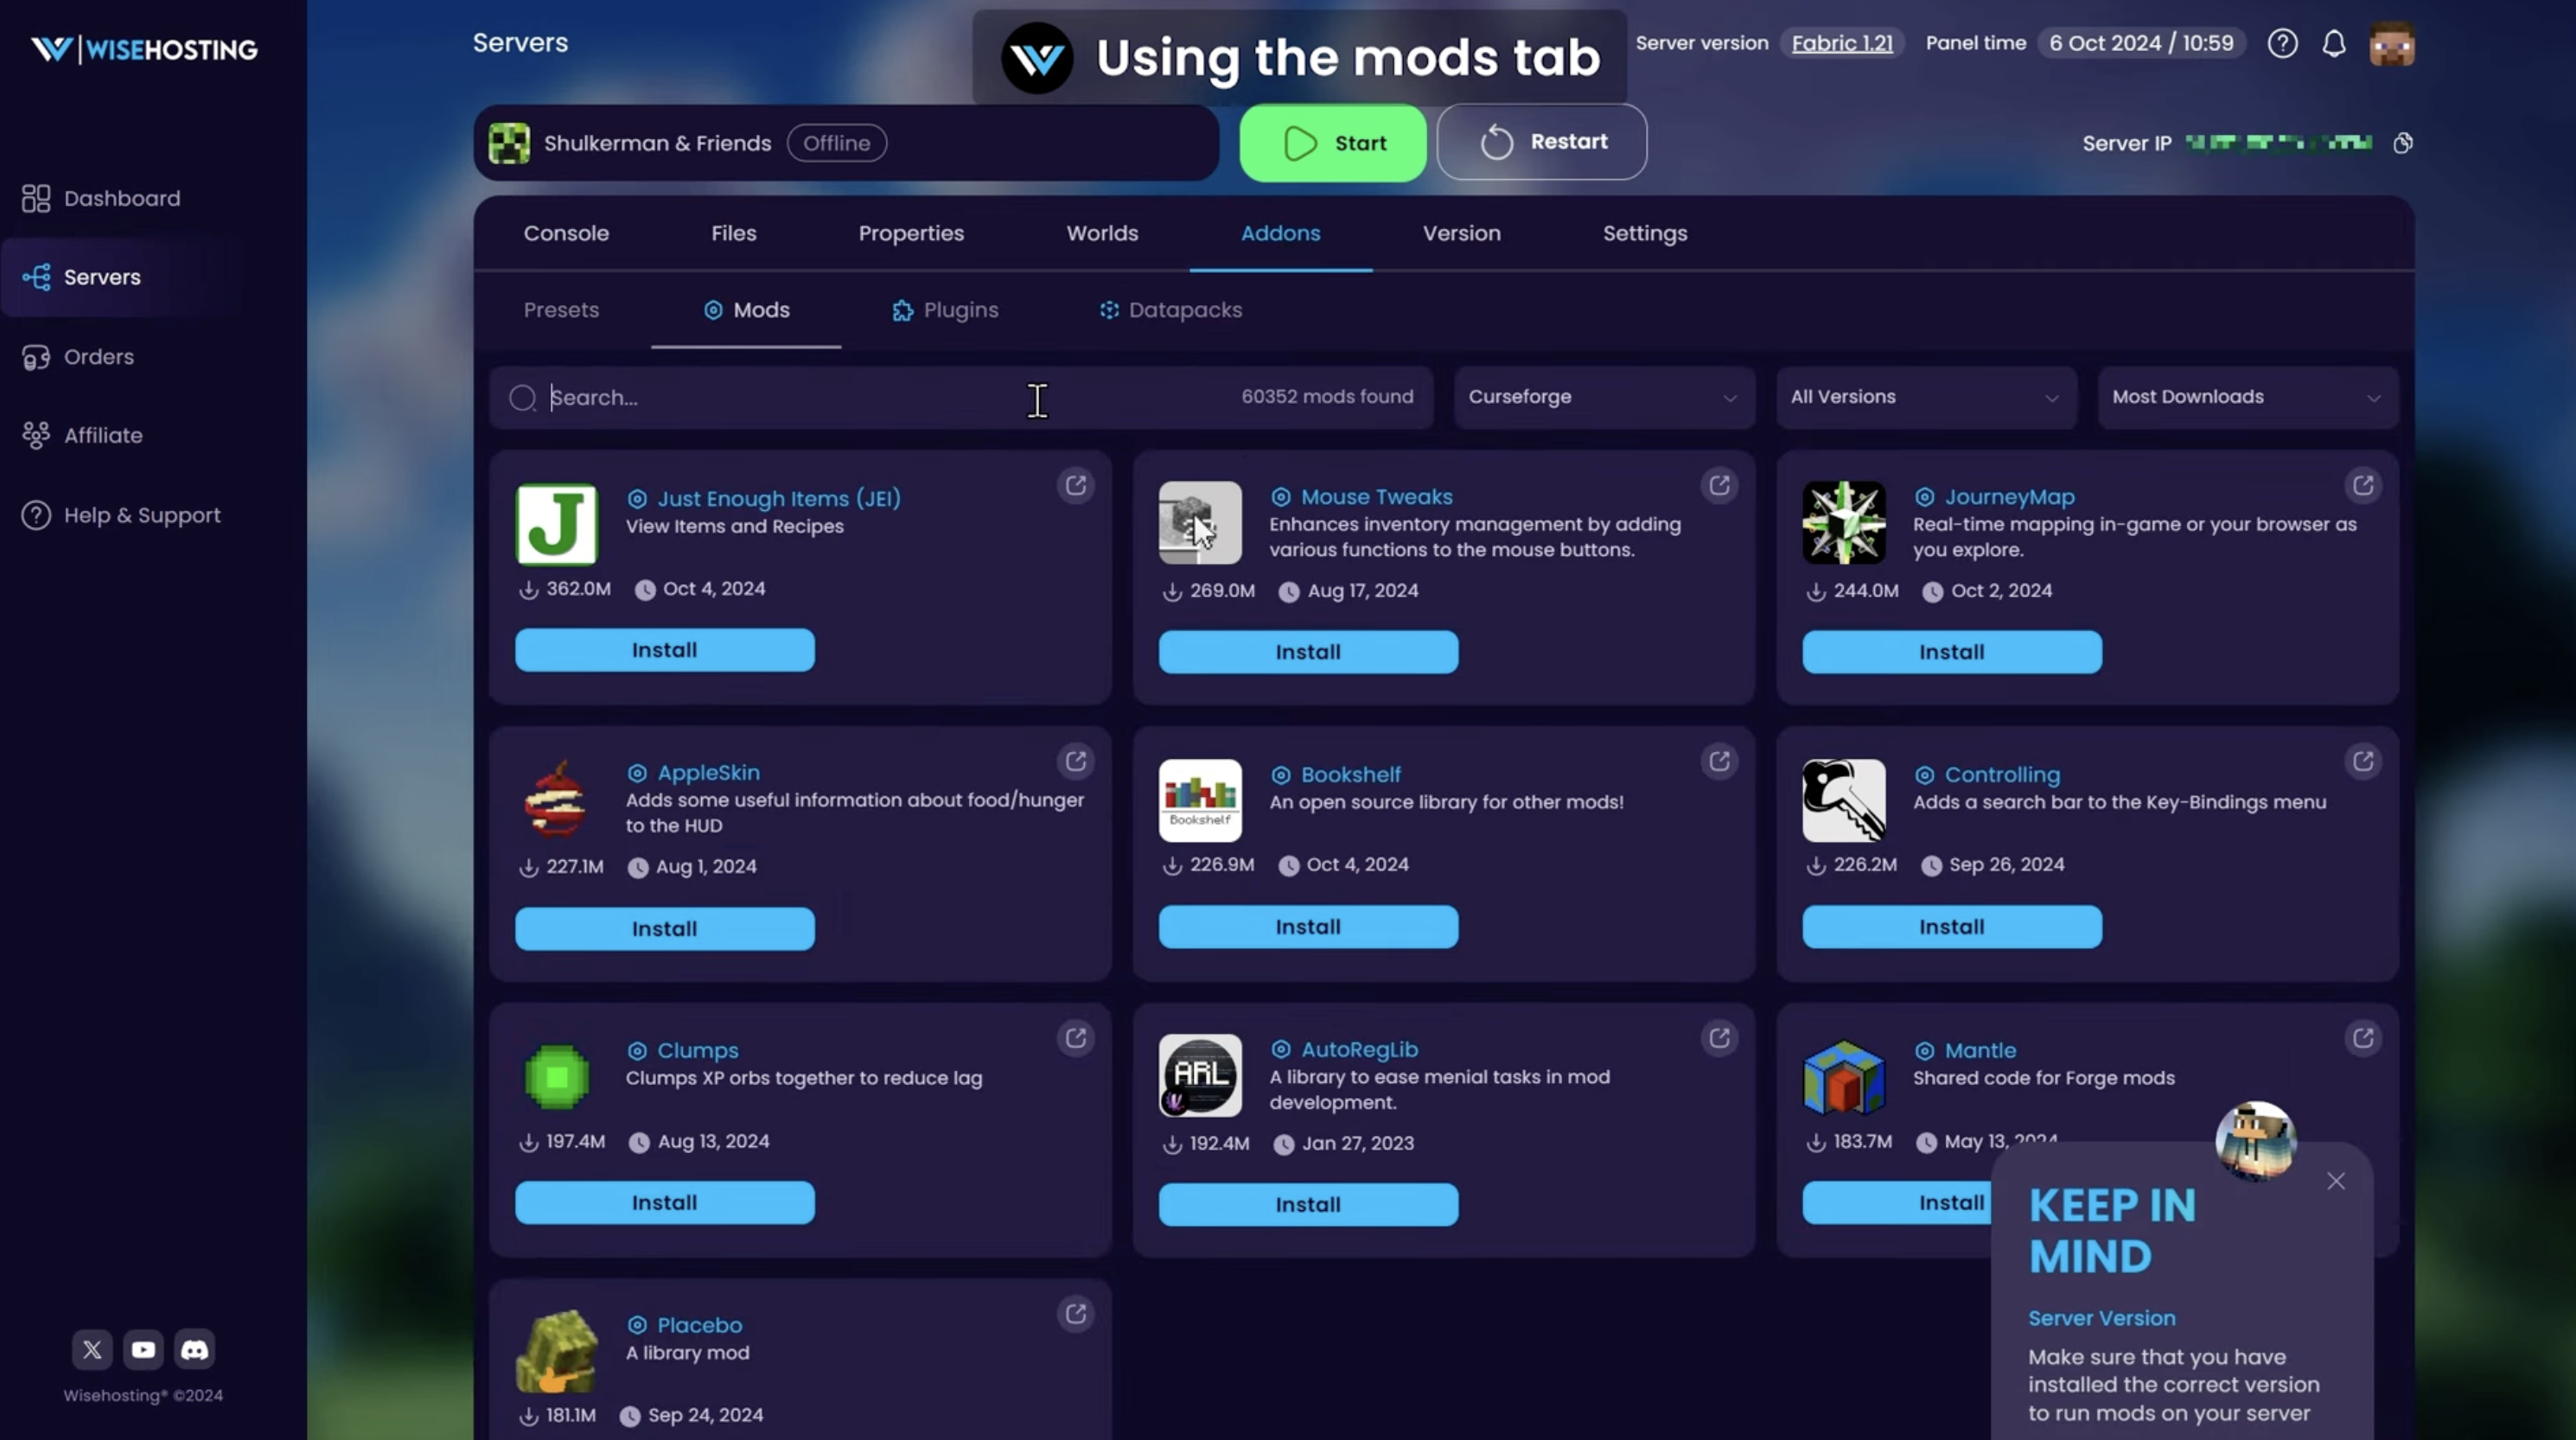
For this guide, the hosted path uses WiseHosting. Their Cobblemon page lists a one-click Cobblemon installer, 24/7 online servers, high-performance hardware, and Cobblemon plans starting at 6 GB RAM. In the current panel flow, you buy the server, open it from the Servers page, install Cobblemon from Addons and Mods, start from Console, then copy the IP from the top right.
How to Make a Cobblemon Server on WiseHosting
- Open the WiseHosting order page and choose a Minecraft server plan. For a private Cobblemon world, choose 6 GB RAM for 2-3 players. Go higher if you expect more players, extra sidemods, or heavy exploration.
- After checkout, open the WiseHosting Game Panel, go to the Servers page, and select the server you just bought.
- In the server page, go to Addons, then Mods. Search for Cobblemon and click the Install button on the Cobblemon result.
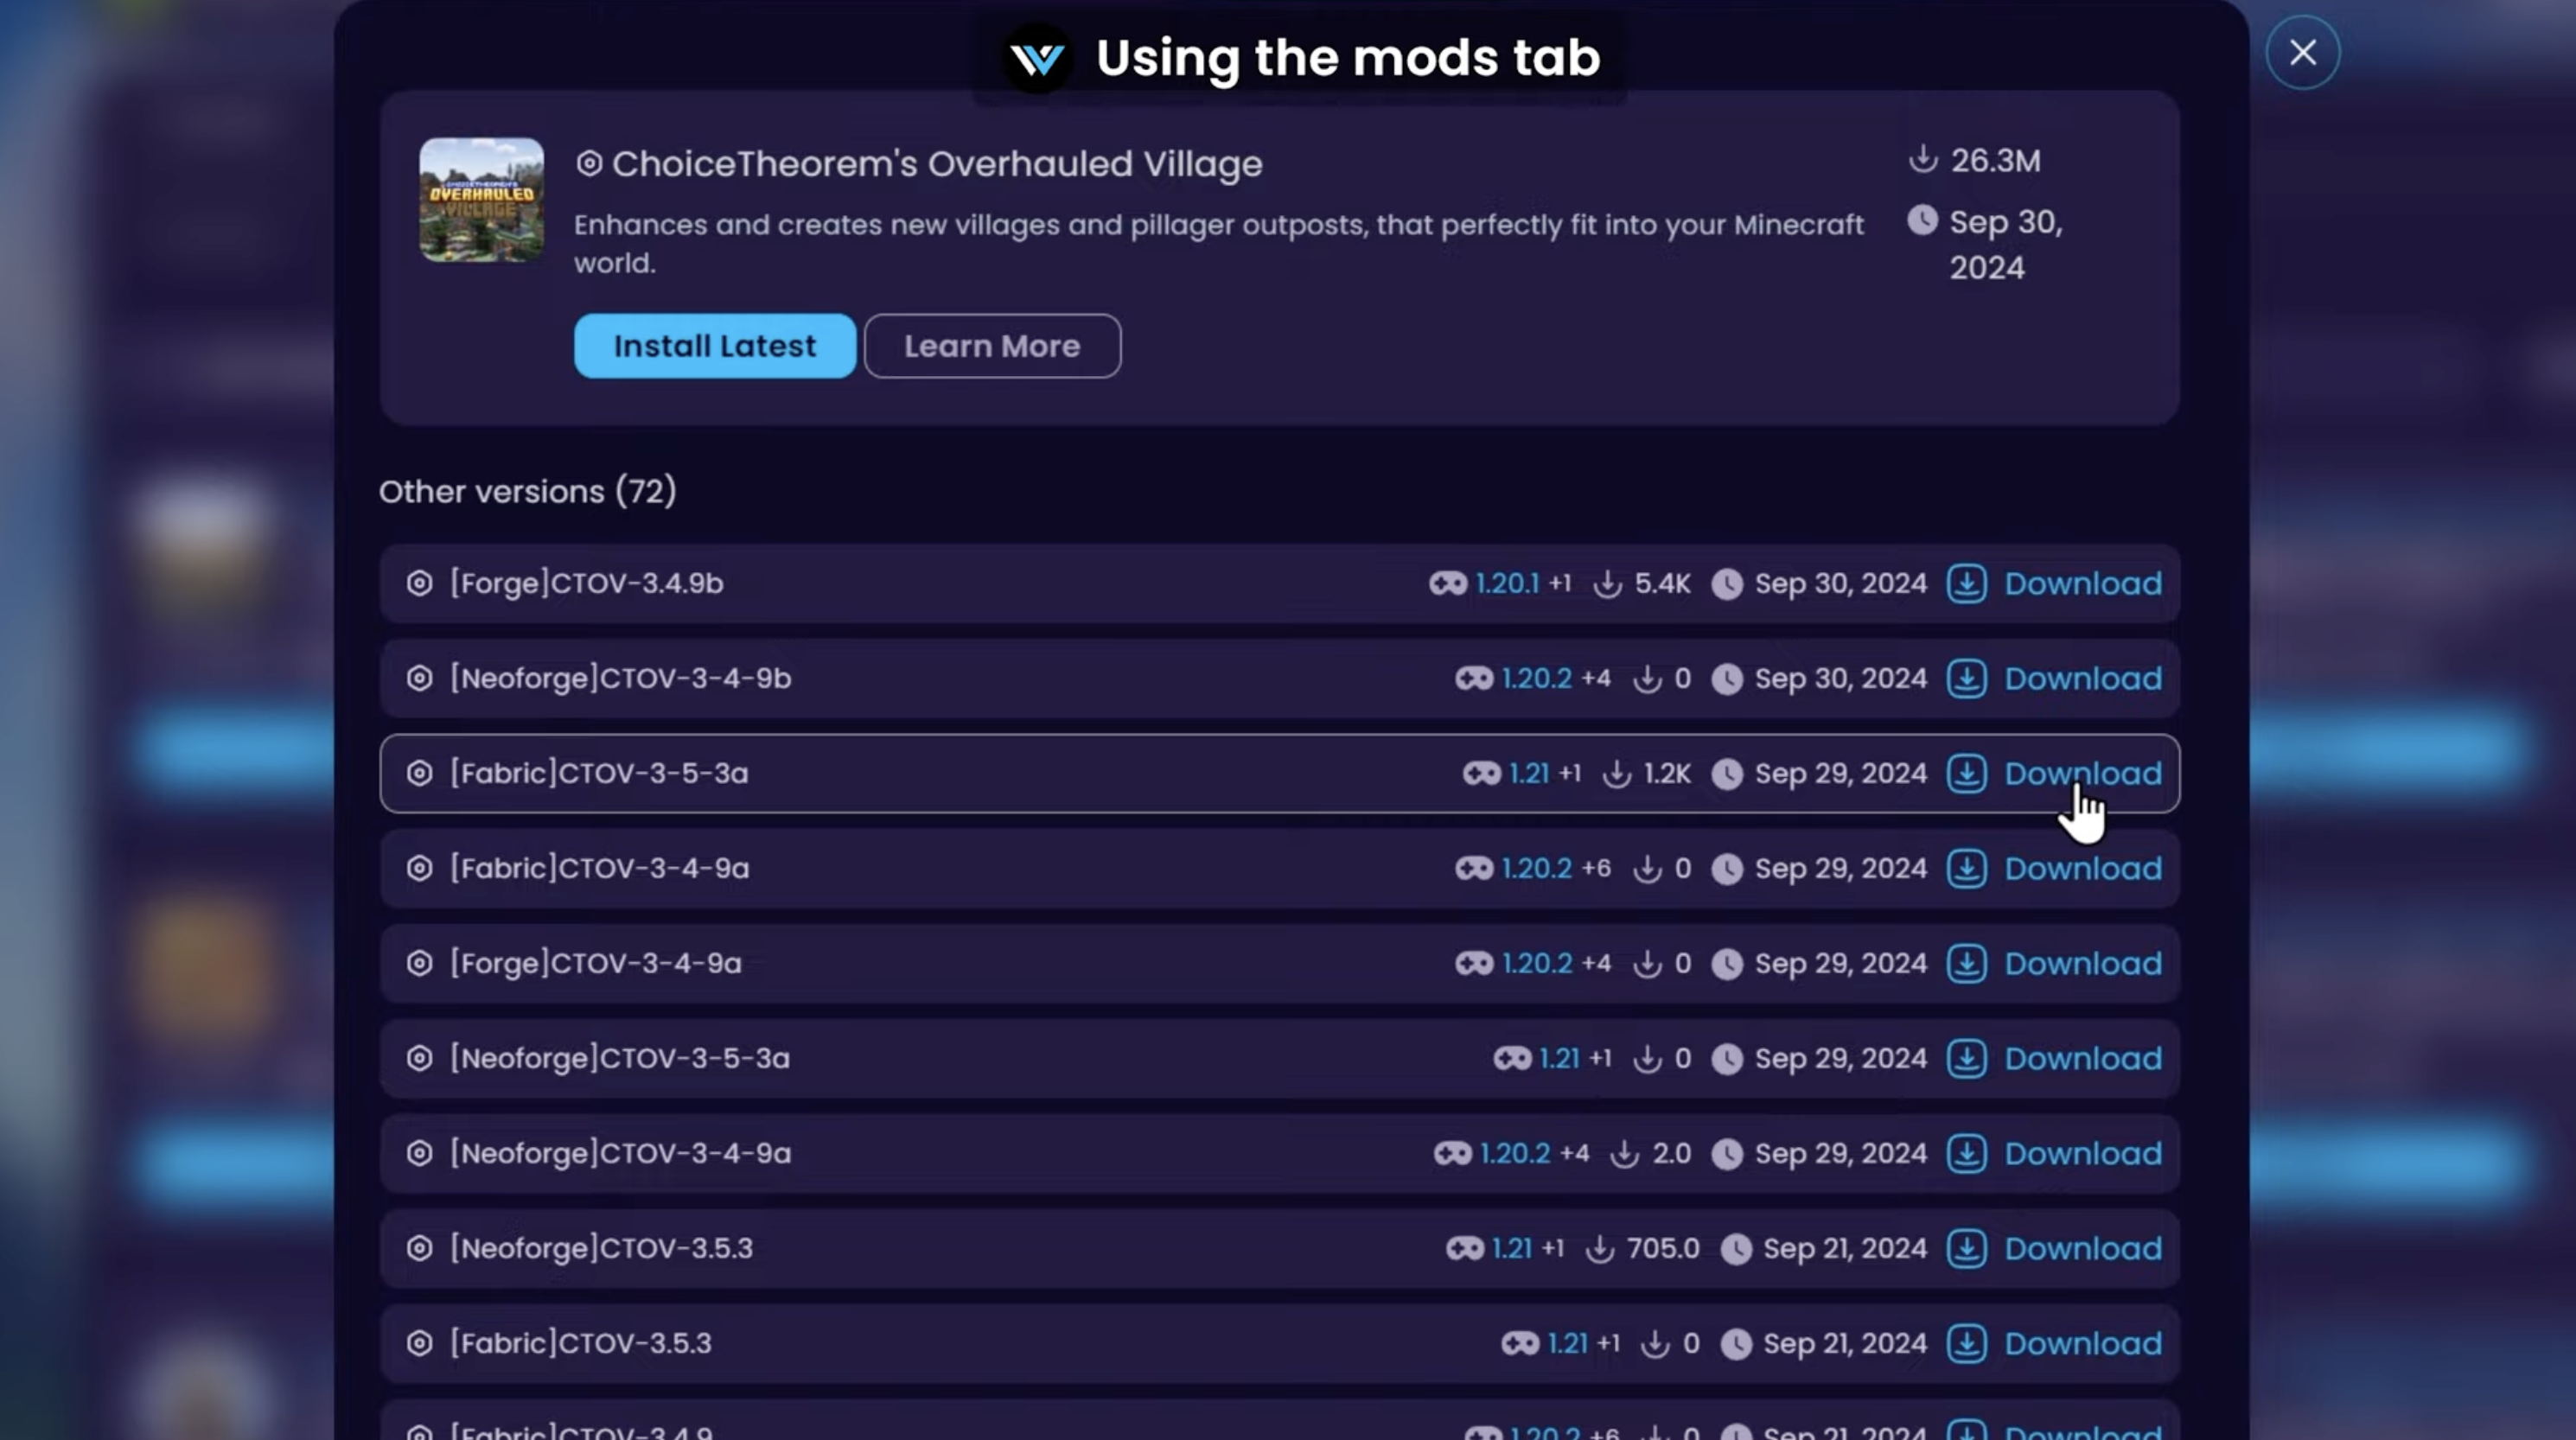
- Choose the Cobblemon version you want to run, then click Download. Use the same version for your players' client installs.
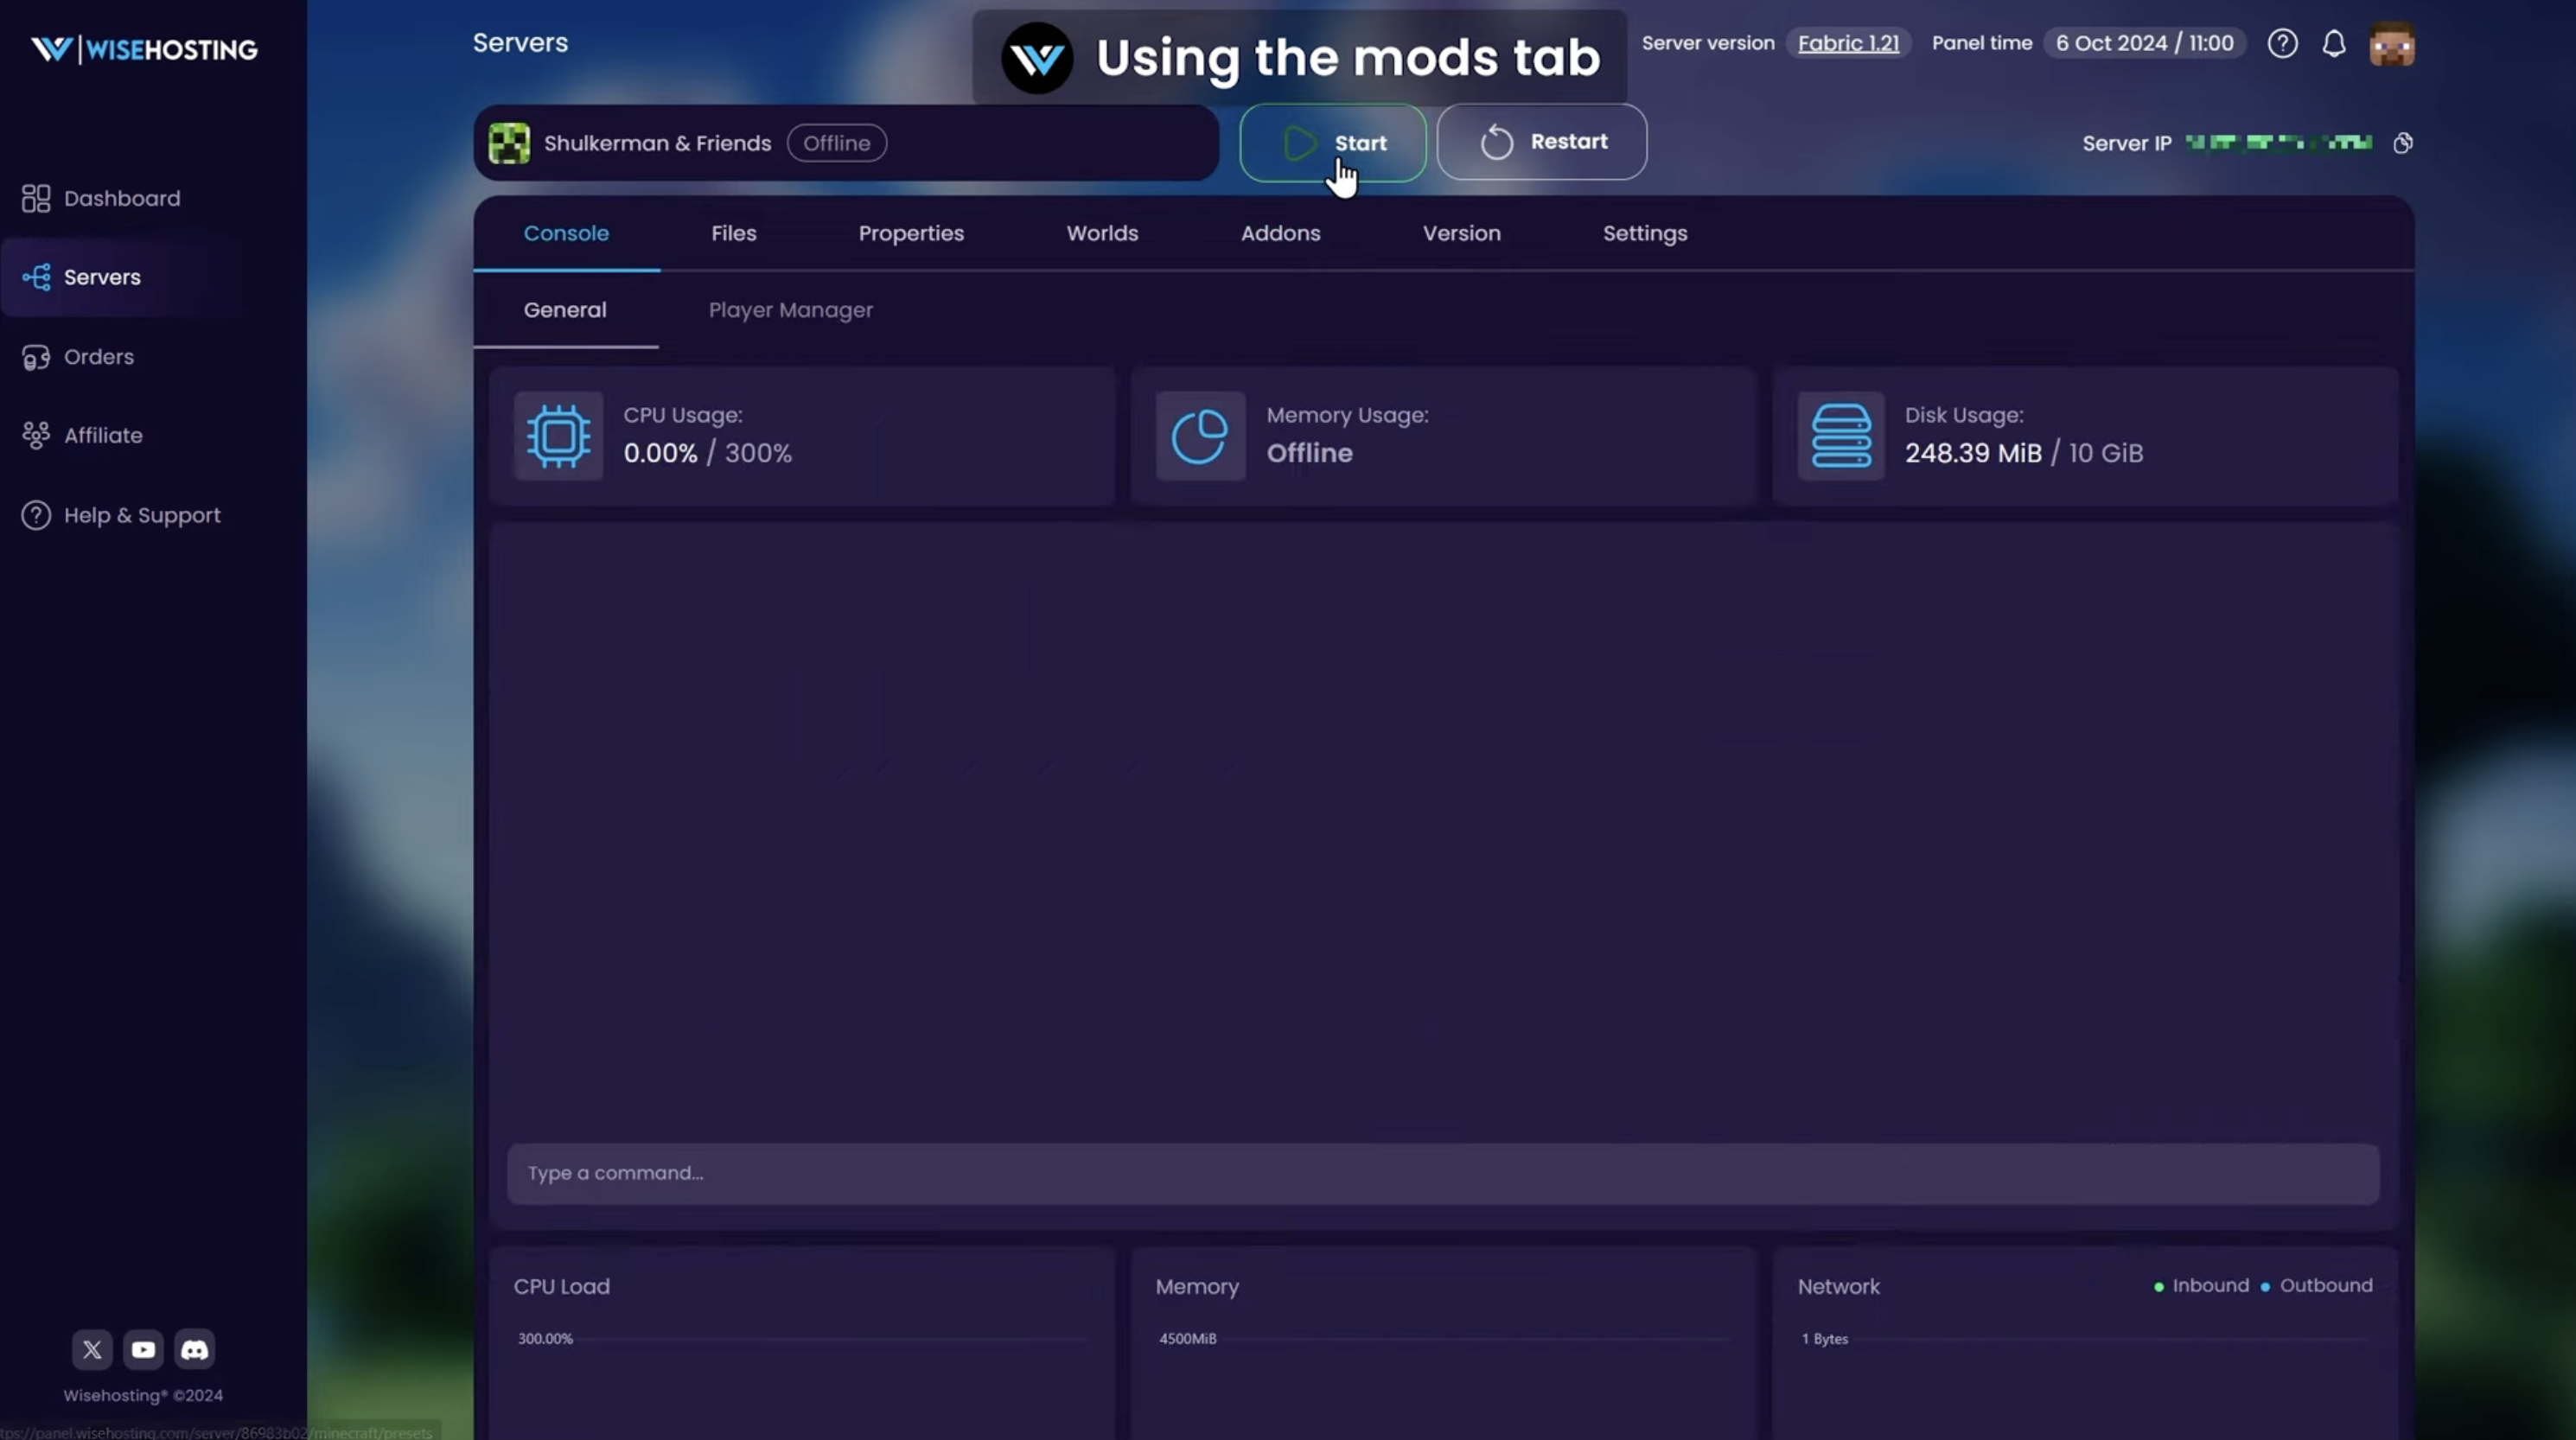
- Once the download is done, open the Console tab on the same server page and click Start. Watch the console during the first boot because the server needs to generate files and load the mod.
- When the server is started, copy the IP from the top right of the server page and send it to your friends with the exact Cobblemon version they should install.
WiseHosting also documents a manual path for custom modpacks: set the correct loader and Minecraft version, upload server-side mod files to the mods folder, upload config or defaultconfigs folders, then start the server and verify the console. Use that route if you are building a custom Cobblemon pack instead of using the built-in modpack installer.
How Much RAM Does a Cobblemon Server Need?
RAM depends on player count, world activity, sidemods, view distance, and whether players explore in different directions. The official NeoForge modpack page says the pack can run with a minimum of 2.5 GB and recommends 3 GB or more for best performance, but that is not the same as a comfortable multiplayer hosting plan. For a real server with friends, leave more headroom.
| Server type | Good starting point | Why |
|---|---|---|
| Small friend server | 6 GB RAM for 2-3 players | Enough room for Cobblemon, a few players, and normal exploration without buying a large community plan immediately. |
| Growing group | 8-10 GB RAM | Better if players spread out, generate terrain, add sidemods, or keep many Pokémon active at once. |
| Public community | 16 GB RAM or more | Public servers need more headroom for concurrent players, moderation tools, scheduled restarts, and world growth. |
Hosted Server vs. Running It Yourself
You can host Cobblemon yourself if you already know how to manage a Java server, router port forwarding, firewall rules, file uploads, restarts, and backups. That gives you control, but it also makes you responsible for uptime and troubleshooting.
Hosted setup is better for most players because the panel handles the repetitive work. Self-hosting is better if you enjoy server administration, have spare hardware, and are comfortable exposing a server safely to friends over the internet.
Launch Checklist
Before inviting people, run through the boring checks. They prevent most day-one server problems.
Recommended First Settings
For a private friend server, keep the first setup simple. Add complexity only after the server is stable.
- Turn on the whitelist unless you want a public server.
- Give operator access only to people who need admin commands.
- Keep automatic backups enabled before changing mods or configs.
- Use a modest view distance if players are exploring in different areas.
- Schedule restarts if the server runs all day and gradually loses performance.
Common Problems
Players cannot join
Check that every player is using Minecraft: Java Edition, the same Minecraft version, the same loader, and the same client modpack. If the server is NeoForge and a player installed a Fabric pack, they will not connect cleanly.
The server crashes after adding mods
Read the console first. Most crashes come from missing dependencies, wrong loader versions, client-only mods uploaded to the server, or mods built for a different Minecraft version. WiseHosting’s mod installation guide specifically warns that Fabric mods do not work on Forge and vice versa.
The server feels laggy
Lower view distance, reduce simultaneous exploration, remove heavy sidemods, schedule restarts, or upgrade RAM/CPU allocation. For Cobblemon specifically, too many active entities and players spread across many chunks can matter more than the number of people online.
Useful Cobblewiki Links for Server Owners
Once the server is running, use Cobblewiki as the reference layer for players. Link these in your Discord or server welcome channel:
- Cobblemon Pokédex for Pokémon stats, types, evolutions, moves, drops, and spawn details.
- Cobblemon spawn guides for biome and bucket hunting.
- Cobblemon drops for farming held items, berries, shards, and other loot.
- Cobblemon servers if you want to compare your setup with public communities.
- Cobblemon modpacks if you want to browse larger packs before building your own.
Final Recommendation
If this is your first Cobblemon server, use hosted setup, keep the modpack standard, enable backups, and invite a small group before opening anything publicly. A stable private server is much easier to grow than a messy public launch.
Start with WiseHosting if you want the fast hosted path. Use manual setup only if you are comfortable matching loaders, uploading files, reading console errors, and maintaining backups yourself.